


Cleaning Up Git Branches
Introduction
Do you contribute to a lot of Git repos that use squash merges in their Pull Requests etc.? I sure do and a lot of the repos that I help to maintain (Azure/Enterprise-Scale) use squash merges exclusively to help keep the git history succinct.
There is a great write up on squash merges in the Azure DevOps docs which I recommend a read of here: Merge strategies and squash merge
The thing I wondered in my early days of using Git more and more was “how do I keep my local branches on my fork of the repo tidy and clean?” and it seems many of you also have this question, as I have been asked this many times over the past year, hence creating this short blog article to help you all 👍
Scenario Setting
Lets set the scenario so we can all follow along in the following steps and then you can all adapt the steps to your repos and branches as required once understood.
- You are working on a repo that you have cloned locally to your machine and it is up-to-date.
- You create a new branch to work on a new feature and you call the branch
my-feature-branch. - You work on your changes in your new branch making the required changes and commits to complete your work for the new feature.
- You then create a Pull Request to get your changes in your new branch, which are now complete, merged into the default branch of your repo which is normally
main(formerlymaster). - The Pull Request is reviewed and your changes in your
my-feature-branchare merged into the default branch of the target repo using the Squash merge option.
A diagram of the above is show below:
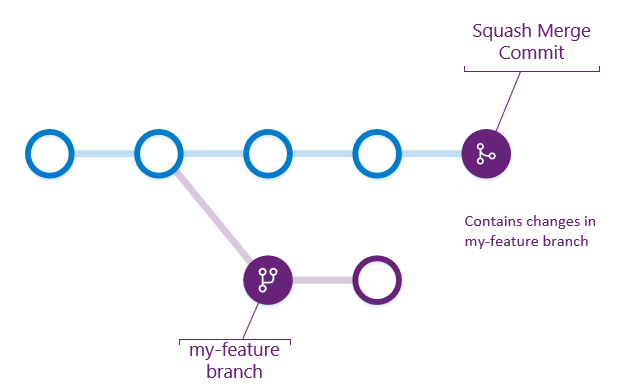
Credit: Azure DevOps Docs
These steps are the same whether your are doing this in a forked repo or a normal (non-forked) repo 😎
Steps to Clean-up Your Local Branches
So now all your changes are merged into the default branch, likely main, on your target repo and you now want to clean-up your local clone of the repo and it’s branches.
For the below steps I’ll assume you have deleted the branch on the remote repo, which is normally done by yourself when the Pull Request is successfully approved and merged by clicking the ‘Delete branch’ button as described here: Deleting a branch used for a pull request
Complete the below steps on your local machine where the branch exists on your local clone of the repo:
- Open the terminal of your choice (CMD, PowerShell, Bash, etc.)
- Navigate to the location where you have stored the local clone of your repo which the branch is created on using
cd - Ensure you are on the default branch of the repo in your local clone. You can change back to it by using the command:
git checkout main(changemainfor whatever the default branch name is in your environment) - Fetch and pull the updates from the remote by running the commands:
git fetch -p- The
-poption means ‘Prune’ and it will before fetching, remove any remote-tracking references that no longer exist on the remote. More info can be found here on “pruning”
- The
git pull
- (Only required if a forked repo) Sync your fork repo with the upstream repo
git fetch upstream(replaceupstreamwith the name of the remote you configured the upstream as. You can find these by runninggit remote -v)git merge upstream(replaceupstreamwith the name of the remote you configured the upstream as. You can find these by runninggit remote -v)- Further info and doing this via the GitHub website can be found here: Syncing a fork
- Delete the local branch
my-feature-branchon your clone:git branch -D my-feature-branch(Note the CAPITAL D - git is case sensitive)- The capital
-Doption is required due to using the squash merge strategy as git is unable to discover if the branch has been merged as the commit history has been squashed into a single commit. - Further info on the
-Doption can be found here
- The capital
- Confirm the branch has been removed successfully by displaying all branches:
git branch -a
Summary
As you can see the steps are quite simple but they must be performed in a specific order. Also, if using a forked repo there is an additional step and this will be more applicable if you are contributing to open-source repos and associated projects.
Regardless I hope you find this post useful and believe me when I say once you do this 3 or times it becomes muscle memory (it has done for me 😊), until it does bookmark this page 👍